.avif)
Sub Zero Ice Maker Not Making Ice: How to Fix
If your Sub-Zero ice maker has stopped producing ice, the most likely causes in order are: the ice maker shutoff arm is in the raised (off) position, the water supply line or filter is restricting flow, the freezer temperature is not cold enough to complete a freeze cycle, or the ice maker module has failed. Sub-Zero ice makers require all four conditions to be met simultaneously before they cycle: power enabled, adequate water supply, correct freezer temperature, and functioning harvest motor. This guide works through each condition in order.
What this means?
Sub-Zero ice makers operate on a timed cycle: fill the mold with a measured water dose from the inlet valve, hold at freezer temperature until the ice thermistor confirms the cubes have hardened, then activate the ejector motor to push cubes into the bin. If water supply is restricted — by a closed shutoff valve, an overdue filter, or low building water pressure — the mold fills partially or not at all, producing small or hollow cubes and eventually stopping production. Sub-Zero's proprietary control electronics communicate freezer temperature, door state, and ice maker status to the main control board — a communication fault between modules can shut down ice production even when all hardware is mechanically functional.
What to do now
Safe checks for a Sub-Zero ice maker:
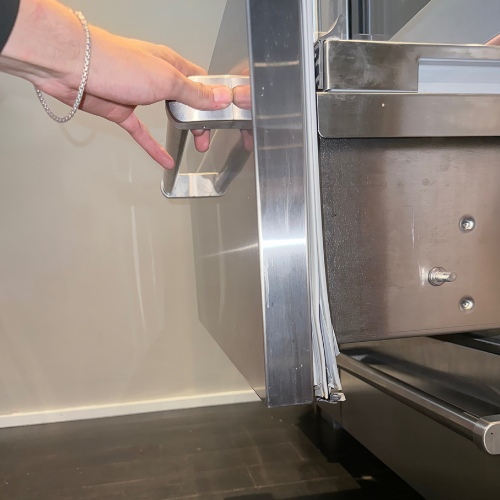
- Confirm the shutoff arm is in the down (ON) position. On most Sub-Zero models with an in-freezer ice maker, a white or metal arm extends from the right side of the ice maker module. Arm raised = off. Lower it manually if it has been moved up accidentally.
- Check the freezer temperature. Sub-Zero freezers should be set to 0°F (-18°C). If the freezer display or a thermometer reads above 10°F (-12°C), the ice maker will not complete a freeze cycle.
- Check the water supply. Confirm the supply valve (typically at the rear base of the unit) is fully open. Check when the water filter was last replaced — Sub-Zero recommends every 12 months.
- Allow 24 hours after any power interruption or after the ice maker was recently turned on. Sub-Zero ice makers take 24 hours to begin producing ice normally after initialization.
What NOT to do
Common Sub-Zero ice maker mistakes:
- Do not use non-Sub-Zero water filters. Sub-Zero filters are sized specifically for their inlet valve flow rates. Third-party filters cause flow restrictions that produce small, hollow, or no ice without triggering a fault code.
- Do not force ice out of a jammed mold. If the ejector has stalled with cubes stuck in the mold, forcing the mechanism manually bends the ejector fingers and requires ice maker module replacement.
- Do not reset the Sub-Zero control board to fix an ice maker fault. Board resets clear the fault log that Sub-Zero-trained technicians use to identify which component failed. Preserve any displayed error codes before any power cycling.
Why this happens
Sub-Zero ice makers stop producing ice from three platform-specific causes. The ice maker shutoff arm is in the raised position — Sub-Zero ice makers use a mechanical arm to detect bin fill level; if accidentally pushed up, production halts entirely until the arm is lowered. The water inlet valve has partially closed from mineral scale: Sub-Zero inlet valves have fine-mesh screens that NYC's moderately hard water deposits calcium on over years of use, progressively restricting the flow volume needed to fill the ice mold within the cycle's timing window. The ice maker module itself has reached end of service life — the ejector motor, mold heater, or harvest thermostat within the module stops cycling correctly after 10–15 years.
How to narrow it down
Start with the simplest check before any diagnosis:
- Is the ice maker shutoff arm in the down position? Arm is up → lower it and allow 24 hours for a test cycle. Do not proceed to other diagnosis until this is confirmed.
- Does the water dispenser produce water normally? No water at dispenser either → the issue is in the water supply or main inlet valve, upstream of the ice maker circuit. Dispenser works → the inlet valve solenoid for the ice maker port or the module has failed.
- What is the freezer temperature? Above 5°F → the ice maker cannot complete a freeze cycle at this temperature. Resolve the cooling issue before diagnosing the ice maker independently.
- How old is this Sub-Zero unit? Over 12–15 years → ice maker module failure at end of service life is the most likely cause if all other checks are clear.
When to stop using it
Disable the ice maker and schedule service if:
- Water is dripping from the ice maker area into the freezer section
- A solid sheet of ice rather than individual cubes is forming in the bin
- The ejector motor makes repeated clicking or grinding sounds without producing cubes
- Frost accumulation is growing in the ice maker bay beyond normal operating levels
Sub-Zero ice maker modules have a typical service life of 10–15 years. Module replacement cost in NYC runs $320–$520 including parts and labor — given Sub-Zero's overall appliance longevity, this is typically the right repair at any age below 18 years.
What to do next
If the basic checks did not restore ice production:
- Tell us: Your Sub-Zero model series, whether the water dispenser (if equipped) is also not producing water, and whether the ice maker arm is in the down position.
- Our Sub-Zero appliance repair page covers all Sub-Zero refrigerator and ice maker configurations serviced in Manhattan and Brooklyn.
- Book a diagnostic — we carry Sub-Zero inlet valves and ice maker modules and provide COI documentation for Manhattan and Brooklyn building access.
.JPEG)