


Whirlpool Dryer Leaves Clothes Damp: Safe Checks
If a Whirlpool dryer warms the load but clothes stay damp, check washer spin, load movement, lint screen, exhaust airflow, and sensor-cycle conditions.
If a Whirlpool dryer warms the load but clothes stay damp, check washer spin, load movement, lint screen, exhaust airflow, and sensor-cycle conditions.
If your Whirlpool dryer leaves clothes damp, check whether the load became warm before assuming the heating system failed. A warm-damp load points first to washer spin, load size or tangling, a coated lint screen, restricted exhaust airflow, or an automatic-cycle endpoint issue. If a confirmed heated cycle leaves the load cold—or the dryer overheats, trips a breaker, smells burned or of gas, or stops repeatedly—use the no-heat or safety path instead of adding more time.
A dryer does not remove water with heat alone. It must move the load, warm an air stream, carry moisture away from the fabric, and send that moisture through the exhaust. On automatic cycles, it also has to decide when the selected dryness target has been reached.
That creates four common versions of “clothes still damp”:
Whirlpool’s U.S. guidance for poor drying emphasizes the lint screen, exhaust vent, loading, and how wet the laundry was after washing. Its no-heat guidance treats a cold load separately. Keeping those symptoms separate prevents a common mistake: replacing a heating part when the dryer already makes heat but cannot use the air path effectively.
Before cleaning or changing several settings, record:
Do not keep restarting an abnormally hot dryer. Warm laundry can be normal; a cabinet, cord, receptacle, or room that becomes unusually hot is a safety signal, especially when airflow is poor.
A dryer does not remove water with heat alone. It must move the load, warm an air stream, carry moisture away from the fabric, and send that moisture through the exhaust. On automatic cycles, it also has to decide when the selected dryness target has been reached.
That creates four common versions of “clothes still damp”:
Whirlpool’s U.S. guidance for poor drying emphasizes the lint screen, exhaust vent, loading, and how wet the laundry was after washing. Its no-heat guidance treats a cold load separately. Keeping those symptoms separate prevents a common mistake: replacing a heating part when the dryer already makes heat but cannot use the air path effectively.
Before cleaning or changing several settings, record:
Do not keep restarting an abnormally hot dryer. Warm laundry can be normal; a cabinet, cord, receptacle, or room that becomes unusually hot is a safety signal, especially when airflow is poor.
Low effort: correct load and program conditions
Why it works: A warm-damp result and a cold result require different diagnostic paths. The drum can tumble normally even when the selected cycle uses no heat or the heating/ignition sequence is absent.
Tools/materials: The exact model’s use-and-care guide.
What to do:
Common mistakes:
Why it works: Laundry that enters the dryer unusually saturated can exceed the normal moisture load even if the dryer is operating. Whirlpool specifically includes washer performance among poor-drying checks.
Tools/materials: Washer display or cycle history if available.
What to do:
Common mistakes:
Why it works: The airflow has to pass between moving items. Packed towels, a sheet wrapped around clothing, or one dense blanket can keep moisture trapped inside the load.
Tools/materials: Laundry basket.
What to do:
Common mistakes:
Why it works: Automatic programs can stop at different residual-moisture targets. A damp-dry or ironing target is not intended to produce the same result as a cupboard-ready or very-dry setting.
Tools/materials: Control-panel photo and cycle chart.
What to do:
Common mistakes:
Medium effort: restore the lint and sensor paths
Why it works: Lint and residue reduce air passage. A screen can look clear yet hold a film from laundry products, limiting airflow.
Tools/materials: Soft brush, mild dish soap and water only if the Whirlpool manual permits washing, and a towel for drying.
What to do:
Common mistakes:
Why it works: Automatic cycles rely on feedback from the load. Residue can interfere with contact and contribute to an early ending while some laundry remains damp.
Tools/materials: Soft cloth and the cleaning method in the exact use-and-care guide.
What to do:
Common mistakes:
High effort: check the exhaust and installation
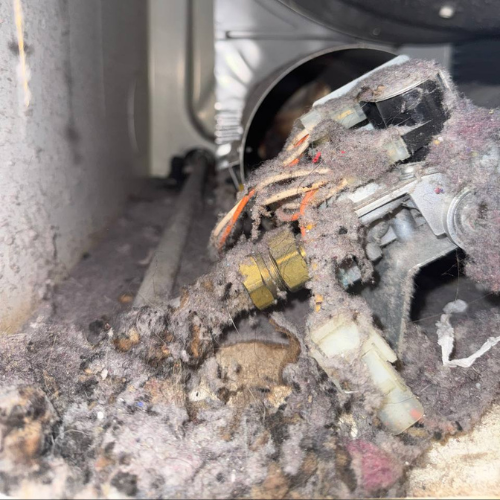
Why it works: Whirlpool identifies crushed or restricted venting as a major poor-drying condition. A dryer can heat while a damaged connector holds moist air in the drum.
Tools/materials: Flashlight; approved vent brush for an accessible, private section; professional duct service for concealed or shared runs.
What to do:
Common mistakes:
Why it works: Gradual increases in time across ordinary loads, hotter laundry, and weak discharge at an accessible exterior termination support an airflow problem. They do not identify whether the restriction is in the connector, concealed duct, termination, or dryer.
Tools/materials: Cycle log and building or installer documentation.
What to do:
Common mistakes:
Why it works: If a normal load is well spun, the correct program is selected, filters and sensor surfaces are clean, and the documented exhaust path is open, internal airflow, heat cycling, temperature feedback, moisture sensing, or control behavior may need measurements.
Tools/materials: Model and serial photos, failed-cycle notes, error photos, and a short symptom video.
Common mistakes:
If you smell gas, do not operate switches, unplug the dryer, use a flame, or make a call in the affected area. Leave, then contact 911 and the gas utility from a safe location.
The dryer may make heat but fail to move enough moist air. Check washer spin, load tangling, lint-screen condition, and the exhaust path before suspecting a heating part.
Yes. A failed drain or final spin leaves substantially more water in the load. Correct the washer result before judging dryer performance.
Heavy cotton and thick seams release moisture more slowly than lightweight fabric. Sort unlike textiles or finish the heavy items with the program the manual recommends.
A small or mixed load, sensor contact, residue on accessible sensor surfaces, or the selected dryness target may affect the endpoint. A repeat early stop with a normal load needs diagnosis.
No. The screen and exhaust duct are separate parts of the air path. A connector or concealed duct can be restricted even when the screen is clean.
That is not a good homeowner test. It releases heat, lint, and moisture indoors and can be unsafe, especially for a gas dryer. Inspect the approved path or use qualified service.
Not from this symptom alone. Damp clothes can result from loading, airflow, sensor behavior, or heat cycling. A fuse or any internal part needs diagnostic confirmation.
No. These checks apply when the load warms or partly dries but remains damp. If the load stays cold on a confirmed heated cycle, use the no-heat guidance.
One controlled comparison after safe corrections is enough. Do not keep running an abnormally hot, tripping, smoking, gas-smelling, or repeatedly stopping dryer.
Provide the model/serial, cycle and options, load type, washer-spin result, end temperature, timing, error photo, and which filters or vent sections were checked.
Whirlpool requests are considered in Brooklyn, Manhattan below 96th Street, and selected Queens routes; laundry-center, venting, gas or electric, built-in, and building-access details are confirmed first.
.jpeg)


Technician experience standard: 4+ years of hands-on appliance repair per technician; senior technicians bring 8 and 16 years. Whirlpool intake starts with Model and Serial or connected identity, cycle or feature, display, failed timing, and installation context. Independent service; no current manufacturer authorization implied.

