

.jpeg)
Whirlpool Dryer Repair NYC | Brooklyn & Manhattan
Whirlpool dryer repair in Brooklyn and Manhattan for AF or Check Vent, PF, L2, F3 codes, F01/F1, no heat, long dry time, no-start, and closet installs.


Whirlpool Dryer Repair
Whirlpool dryer showing af, check vent, long dry, or damp load, no-start, water, movement, heat, odor, or access-limited behavior? Send the model photo, display photo, symptom timing, and access notes.
Same/Next Day Availability!


Identify your Whirlpool dryer before the repair path is named
Whirlpool dryer diagnosis depends on exact display, gas or electric platform, airflow/vent path, heat behavior, lint screen, sensor-cycle behavior, power messages, drum movement, and whether the dryer is stacked, in a closet, or blocked by duct/outlet access.
Send the model tag, full display photo, selected cycle or program, load type, whether water or heat behavior changed, visible hose/filter/door/vent photos where safe, and wide installation photos. If the appliance is stacked or built in, document access before moving anything.
Whirlpool dryer repair router for Brooklyn and Manhattan
Whirlpool dryer repair works best as a router for AF/Check Vent, PF, L2, F3 sensor routes, F01/F1 control routes, no heat, long dry time, no-start, drum movement, and stacked or closet installation access.
This route stays on Whirlpool dryer diagnosis. Parent-category and related-appliance navigation are grouped in the related routes section.
- Airflow route: Separate lint screen, AF/Check Vent, visible vent, outside exhaust, closet heat, and damp-load result.
- Heat route: Separate gas/electric platform, fully cold load, weak heat, F4-style codes, and airflow before naming a repair.
- Power route: Separate PF, L2, outage history, breaker behavior, outlet context, and whether the drum turns.
- Sensor and control route: Separate F3 sensor behavior, automatic dry results, F01/F1 control-state route, and start response.
- Access route: Treat stack, closet, cabinet, vent route, outlet/gas access, and building rules as diagnostic data.
Diagnostic Process
How the Whirlpool dryer route is separated
The first decision is not a part name. It is model tag, exact display wording, platform, water or heat behavior, load state, installation access, and safety signal.
Airflow route
Separate lint screen, AF/Check Vent, visible vent, outside exhaust, closet heat, and damp-load result.
Heat route
Separate gas/electric platform, fully cold load, weak heat, F4-style codes, and airflow before naming a repair.
Power route
Separate PF, L2, outage history, breaker behavior, outlet context, and whether the drum turns.
Sensor and control route
Separate F3 sensor behavior, automatic dry results, F01/F1 control-state route, and start response.
Access route
Treat stack, closet, cabinet, vent route, outlet/gas access, and building rules as diagnostic data.
The route ends as safe observation, accessible check, evidence collection, access planning, appliance diagnosis, stop using, or wrong page. A code or symptom should not become a repair conclusion without model and test evidence.
Can You Fix It Yourself or Should You Call a Professional?
Safe Whirlpool dryer checks before booking
Safe customer work is observation: photograph the display, record the cycle, document the load, inspect only visible hoses, filters, lint screens, doors, vents, or access points that the model exposes without moving a stacked or built-in appliance.
Do not remove covers, inspect wiring, loosen supply fittings, pull against a locked door or lid, defeat a latch or switch, drag out a stacked appliance, reach blindly behind cabinetry, or keep running cycles after a returning fault.
Stop using the appliance for smoke, burning smell, unusual heat, active water near powered areas, abnormal drum movement, gas odor on dryer routes, or a breaker that trips again.
.avif)
Brooklyn Appliance Repair
Manhattan Appliance Repair
HVAC Repair
Whirlpool Dryer Repair in Brooklyn & Manhattan
Whirlpool dryer related routing
This Whirlpool dryer page is scoped to Brooklyn and Manhattan. Use the related route that matches the appliance, symptom, or access constraint.
- Residential dryer repair: broader dryer route.
- Whirlpool washer repair: same-brand washer route.
- Whirlpool dryer clothes still damp: deeper damp-load route.
- Whirlpool dryer no heat: deeper heat route.
- Dryer vent clogged in NYC apartment: airflow/access route.
- Dryer drum not turning: drum route.


Error Code Reference
Whirlpool dryer code and symptom atlas
Only source-backed codes, messages, and symptom routes belong here. Model, display wording, timing, water or heat behavior, and installation still control the final route.
AF / Check Vent: Airflow and vent route
The dryer is on an airflow or vent-restriction route. Safe observation: Clean visible lint screen and photograph visible vent/closet path without moving a stacked dryer.
Stop boundary: Stop for hot cabinet, burning smell, smoke, shutdown, or returning airflow message. Technician confirmation: Confirm lint path, transition duct, building exhaust, heat cycling, and access.
PF: Power-failure route
The dryer recorded a power interruption or power-state route. Safe observation: Photograph display and note when power changed.
Stop boundary: Stop for breaker trip recurrence, electrical odor, hot cord/outlet, smoke, or water near power. Technician confirmation: Confirm supply context, terminal/cord route by qualified path, control state, and access.
L2: Low-voltage or supply route
The dryer is on a low-voltage/supply route. Safe observation: Record whether drum turns, whether heat appears, and visible plug/outlet context if safe.
Stop boundary: Stop for breaker trip recurrence, hot cord/outlet, electrical odor, or water near power. Technician confirmation: Confirm supply, heat request, terminal condition by qualified route, and controls.
F3 E1 / F3 E2 / F3 E3: Temperature or moisture-sensing route
The dryer is on a temperature or moisture-sensing route. Safe observation: Photograph exact code and note whether the load was cold, warm, damp, or overheated.
Stop boundary: Stop for unusual heat, burning smell, smoke, shutdown, or returning sensor code. Technician confirmation: Confirm airflow, heat source, temperature/moisture feedback, wiring path, controls, and access.
F01 / F1 E1: Control-state route
The dryer is on a control or electronics fault route, not a homeowner part decision. Safe observation: Photograph exact code and record what the dryer did before stopping.
Stop boundary: Stop for returning code, electrical odor, heat, smoke, water nearby, or unstable power. Technician confirmation: Confirm power, control state, display route, heat request, and safe access.
F4 E1 / F4 E3 / F4 E4: Heat or air-temperature route
The dryer is on a heat, air-temperature, or heater-response route. Safe observation: Record whether the drum turns, whether any warmth appears, lint screen state, and gas/electric platform.
Stop boundary: Stop for gas odor, burning smell, smoke, unusual heat, or breaker trip recurrence. Technician confirmation: Confirm airflow, heat source, ignition/electric heat route, temperature feedback, and access.
New York City — What's Different
NYC apartment and building access notes for Whirlpool dryers
Whirlpool dryers in Brooklyn and Manhattan are often stacked, set in closets, connected to long vent runs, or blocked by cabinet and outlet access. Those details change whether the first branch is airflow, heat, power, sensor, drum, or access planning.
If the dryer cannot be reached without dragging, lifting, kinking a duct, removing cabinetry, or reaching blindly behind the machine, the first step is access planning. Send photos of the opening, floor, side clearance, vent route, and building requirements.
Symptoms
Whirlpool dryer symptom branches
Whirlpool dryer complaints can look similar from the outside. The route changes when the same symptom has different model, platform, water, heat, load, code, or access evidence.
Airflow route
Use lint screen, visible vent path, AF/Check Vent behavior, closet heat, and load result before treating damp clothes as a heat failure.
Heat route
Separate fully cold loads, weak heat, gas/electric platform, power messages, and temperature-code behavior before repair decisions.
Power and control route
PF, L2, F01/F1, no-start, and display-state complaints need event timing, supply context, and start response.
Sensor-cycle route
Automatic dry, mixed fabrics, moisture sensing, and timed dry comparison can change the branch before a control claim.
Access route
Stacked, closet, cabinet, duct, outlet, or gas-access limits can make access planning the first step.
Top Symptoms
Whirlpool dryer failure-mode library
Each branch keeps customer action to observation or accessible checks, then states the stop boundary and what the technician confirms.
AF, Check Vent, long dry, or damp load
The dryer displays AF/Check Vent, clothes remain damp, or dry time increases while the drum still heats. Whirlpool dryer support lists AF/Check Vent as a dryer error route; dryer safety sources keep lint and vent condition central. The decision changes when: Lint screen, visible vent path, transition duct, outside exhaust, load size, washer spin, closet heat, and stacked access change the route.
Safe: Clean the visible lint screen and photograph visible vent/closet path without moving a stacked dryer. Avoid: Do not clear hidden ducts, pull a stacked dryer forward, or keep running hot cycles to prove the warning. Stop: Stop for hot cabinet, burning smell, smoke, shutdown, or returning airflow message.
Send: Display photo, model tag, lint screen, vent/closet photos, load type, and timing. Confirm: Confirm lint path, transition duct, building exhaust, heat cycling, moisture sensing, and access. Result: Airflow route; appliance diagnosis only after access and restriction are separated.
No heat or weak heat
The drum turns but the load stays cold, partly warm, or dries only after repeated cycles. Whirlpool dryer code routing separates heat, temperature, airflow, power, and model-specific control routes. The decision changes when: Gas/electric platform, L2/PF/F4 code, lint path, vent restriction, load size, and building access change the branch.
Safe: Record whether the drum turns, whether any warmth appears, and whether the dryer is gas or electric. Avoid: Do not open heating areas, inspect wiring, loosen gas fittings, or keep repeating hot cycles after odor appears. Stop: Stop for gas odor, breaker trip recurrence, electrical odor, smoke, or burning smell.
Send: Model tag, gas/electric type, cycle, heat timeline, display, and install photos. Confirm: Confirm supply, heat request, ignition or electric heat route, airflow, sensors, and controls. Result: Heat route; appliance diagnosis after safe evidence.
PF, L2, or power/supply message
The display shows PF, L2, or the dryer behaves like power or supply changed during operation. Whirlpool lists PF and L2 among dryer display/error states; exact meaning depends on model and platform. The decision changes when: Recent outage, breaker behavior, electric versus gas dryer, drum turns/no heat, outlet context, and stacked access change the route.
Safe: Photograph the display and visible plug/outlet context if safe. Avoid: Do not inspect wiring, open terminal covers, or repeatedly reset power after a trip. Stop: Stop for breaker trip recurrence, hot cord/outlet, electrical odor, smoke, or water near power.
Send: Display photo, model tag, outage/install history, heat behavior, and access photos. Confirm: Confirm supply context, heat request, terminal/cord route by qualified path, control state, and access. Result: Electrical boundary route.
F3 temperature or moisture-sensing route
The dryer shows an F3-family code or behaves as if sensor feedback is wrong. Whirlpool dryer error-code index lists F3 E1 through F3 E5 dryer routes; technical literature maps sensor circuits by model. The decision changes when: Exact code, heat state, damp load, airflow, lint screen, sensor surface, and model family change the branch.
Safe: Photograph exact code and note whether the load was cold, warm, damp, or overheated. Avoid: Do not test sensors, remove covers, or keep restarting after a returning sensor code. Stop: Stop for overheating, odor, smoke, shutdown, or returning code.
Send: Code photo, model tag, cycle, heat behavior, lint state, and access photos. Confirm: Confirm airflow, temperature/moisture feedback, heater response, wiring path, controls, and model context. Result: Sensor route; customer action stops at evidence and visible lint/vent observations.
F01/F1 or control-state route
The dryer stops with F01, F1 E1, or another control-style code. Whirlpool dryer support lists F01 and F1-style dryer errors; public copy should not convert them into board replacement claims. The decision changes when: Power stability, water exposure, heat behavior, start response, display timing, and code return change the branch.
Safe: Photograph exact code and record what the dryer was doing when it appeared. Avoid: Do not open electronics areas or keep cycling power after the code returns. Stop: Stop for returning code, water nearby, odor, heat, smoke, or unstable power.
Send: Code photo, timing, start behavior video, model tag, and access photos. Confirm: Confirm power, display state, communication/control route, heat request, and safe access. Result: Appliance diagnosis branch.
Dryer will not start or drum will not turn
The panel wakes but the dryer does not start, hums, or the drum does not tumble normally. Whirlpool dryer code and support routing separates display states, start response, motor/drum behavior, and access. The decision changes when: Door state, start input, load caught in drum, belt/motor response, power behavior, and stacked access change the branch.
Safe: Record display state and a short video of the start attempt. Avoid: Do not hold switches, force the drum, or keep starting a humming dryer. Stop: Stop for abnormal drum movement, burning smell, repeated failed starts, or power instability.
Send: Start video, display photo, model tag, door state, and access photos. Confirm: Confirm door feedback, motor response, drum path, control state, supply, and access. Result: No-start/drum route; appliance diagnosis if normal start fails.
Wrinkling, cycle ending early, or sensor dry leaves items damp
Automatic dry ends with heavier items damp, clothes wrinkle, or dry result changes by load type. Whirlpool dryer routing uses model, sensor, airflow, heat, and cycle context rather than one universal part answer. The decision changes when: Load size, mixed fabrics, bulky towels, moisture sensing, washer spin, airflow, and closet heat change the branch.
Safe: Record load mix, cycle, dryness level, heat behavior, and whether timed dry behaves differently. Avoid: Do not assume a control part before separating load contact, cycle, and airflow behavior. Stop: Stop for overheating, burning smell, smoke, or repeated mid-cycle shutdown.
Send: Cycle, load, timing, heat behavior, lint screen, model tag, and install photos. Confirm: Confirm sensor contact, cycle behavior, heat cycling, airflow, load pattern, and access. Result: Sensor-cycle route; collect evidence before booking.
Stacked or closet-installed Whirlpool dryer access problem
The dryer symptom is clear, but the machine is stacked, in a closet, or blocked by cabinet, duct, or outlet access. Whirlpool dryer troubleshooting often depends on lint, vent, power, heat, and model access; NYC installs can block those routes. The decision changes when: Stack kit, closet depth, cabinet toe-kick, vent route, front clearance, outlet/gas access, and building rules change service planning.
Safe: Send wide front photos, side-clearance photos, floor/door swing, and visible vent or outlet context. Avoid: Do not drag out the dryer, remove cabinetry, or reach behind the appliance blindly. Stop: Stop if movement would kink vent/supply, water is present, or heat/odor appears during access attempts.
Send: Wide install photos, model tag, building requirements, and access notes. Confirm: Confirm access plan first, then heat, vent, start, sensor, power, or drum branch. Result: Access planning route.
What's Included
What to send for Whirlpool dryer service
- Model tag photo and full display photo.
- Selected cycle or program, load type, and when the symptom appears.
- Visible hose, filter, lint-screen, door/lid, vent, or drain photos where safe and applicable.
- Wide installation photos showing stack, closet, cabinet, floor, door swing, side clearance, and access limits.
- Building access notes: COI request, service elevator, doorman, super access, floor protection, and shutoff access if known.
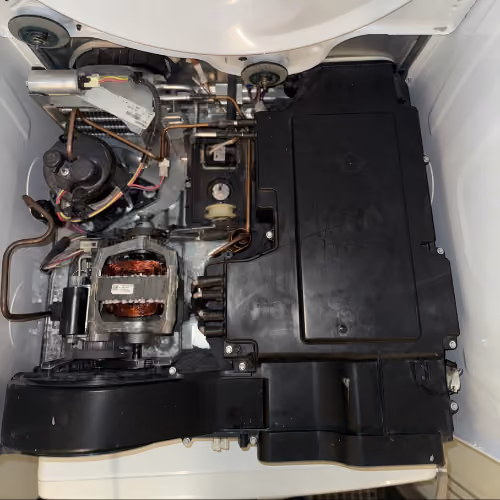
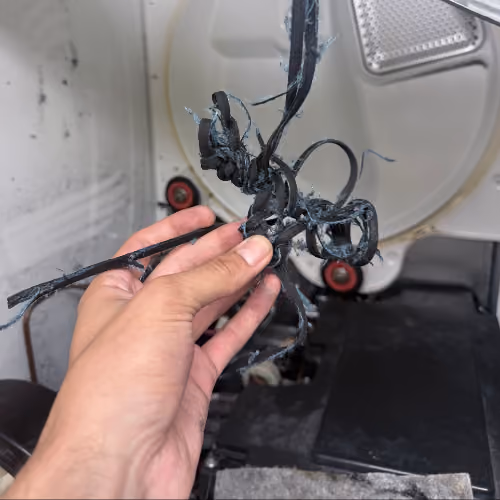
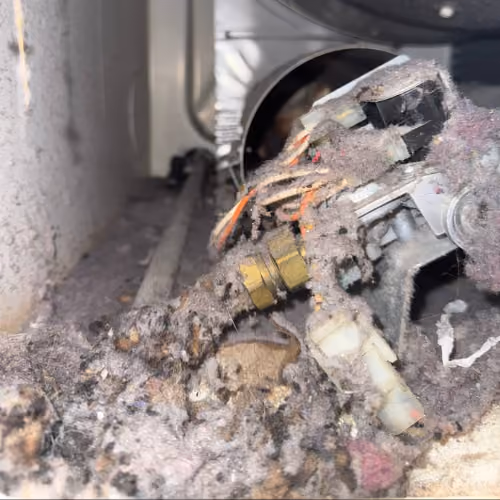
Photos from real jobs: what we found, what we tested, and what we fixed.
FAQ
Q1.
What should I send for Whirlpool dryer repair?
Send the model tag, full display photo, selected cycle, load type, symptom timing, and wide installation photos. Include building access notes before dispatch.
Q2.
What if my Whirlpool dryer has a code?
Photograph the exact display. The same code family can change by model, platform, cycle phase, water or heat behavior, and access.
Q3.
What can I check safely before booking?
Stay with visible observations: display, load, cycle, lint screen or hoses where safe, water level, and access photos. Do not open panels or move a stacked appliance.
Q4.
When should I stop using the Whirlpool dryer?
Stop when the symptom becomes a heat, airflow, gas, or power safety signal: burning smell, smoke, hot cabinet, gas odor, water near the cord or outlet, or a breaker that trips again. Do not run another cycle to prove the fault.
Q5.
What if the Whirlpool dryer is stacked or built in?
Do not drag or lift it. Send wide photos of the opening, floor, side clearance, visible hoses or vent, and building requirements so access is planned first.


Book Whirlpool dryer repair with model, display, load, visible access, symptom timing, and installation photos so the visit starts on the correct route.